VNC Tunnel to Kali Linux with mRemoteNG
To say that this is a bit of a pain is somewhat understating the problem (though, no worse than formatting a WordPress article). The latest versions of Kali (including the just released kali-rolling) do not have functionality with gnome over VNC. Given this, you’ll have to install an alternate window manager before even trying to move forward. In any case, I’ve tried to compile a get-up-and-running guide to this for others to follow.
What you’ll need:
- About an hour assuming you have all the prep done.
- A working copy of Kali linux
- tightvncserver is installed (but not running) by default
- sshd is installed (but not running) by default
- A working client system (this assumes you are using Windows)
- mRemoteNG
- A general understanding of VNC, Linux, and how to make things connect to one another
We will NOT cover:
- How to configure the desktop properties for your VNC session
- How to configure your ssh session to use keys instead of the root password (you should do this however)
- How to configure, update, modify your firewall or other security programs that you may have that could interfere with this.
Also, you should be able to do this under any user, however, since almost all of the major tools in Kali will require root access to run, this is one of those extremely rare occurrences where running as root may be your best option.
So given the Gnome problems with Debian, the first thing you’ll need is to install Mate as shown below:
sudo apt-get install mate-core mate-desktop-environment-extra mate-desktop-environment-extras mate-themes
Next, you need to start VNC in order for it to generate the configuration file, it will also ask you for a password here, make sure you remember what you set it to or store it in a secure manner.
tightvncserver :1
You can test it now by connecting to it over the network on port 5901 if you want, it is not yet secure so you should kill the session immediately after testing by the command below.
tightvncserver -kill :1
Now you’ll need to edit your VNC configuration file located in .vnc/xstartup as shown below. Essentially, you’re going to change it from using…
/etc/X11/Xsession
To
/usr/bin/mate-session
A before and after config are shown after the next step below. Out of the box you will also run into the following error Could not acquire name on session bus which is solved by adding the line below toward the top of the file.
Unset DBUS_SESSION_BUS_ADDRESS
The original configuration will look something like this…
#!/bin/sh
 xrdb $HOME/.Xresources
 xsetroot -solid grey
 #x-terminal-emulator -geometry 80x24+10+10 -ls -title "$VNCDESKTOP Desktop" &
 #x-window-manager &
 # Fix to make GNOME work
 export XKL_XMODMAP_DISABLE=1
 /etc/X11/Xsession
Your modified file should look something like this…
#!/bin/sh
 unset DBUS_SESSION_BUS_ADDRESS
 xrdb $HOME/.Xresources
 xsetroot -solid grey
 #x-terminal-emulator -geometry 80x24+10+10 -ls -title "$VNCDESKTOP Desktop" &
 #x-window-manager &
 # Fix to make GNOME work
 export XKL_XMODMAP_DISABLE=1
 #/etc/X11/Xsession
 /usr/bin/mate-session
You’ll also need to change your sshd_config file to use password authentication for root. This is NOT recommended and if you’re doing this on a system you care about, you should set up key based authentication (not covered here).
Edit the /etc/ssh/sshd_config file and look for…
PermitRootLogin prohibit-password
Comment it out and add the line as shown below.
#PermitRootLogin prohibit-password
 PermitRootLogin yes
Now that you have the session file and ssh squared away you’ll need to get VNC up and running. You can start the VNC service and tell it to listen ONLY on localhost (this is very important otherwise it will be open to the internet) by starting it as follows.
tightvncserver -localhost :1
This command will tell the server to start on port 5901 and listen only for local connections.
Next, you will need to start your SSH server by the following command.
service ssh start
Now that you have SSH running, and VNC running but listening locally, you can configure your client. Launch mRemoteNG and from the Tools menu choose Options followed by Advanced.
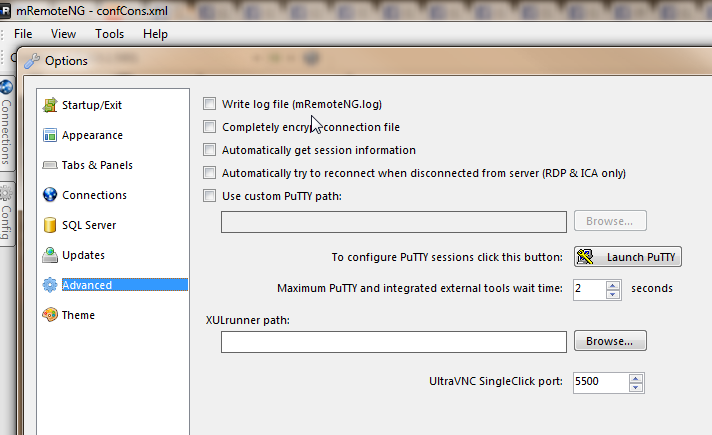
From here, choose Launch PuTTY.
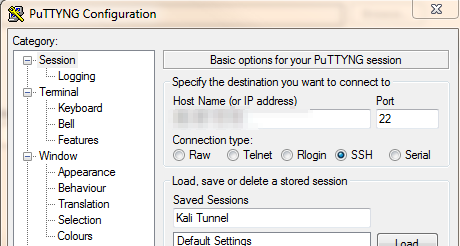
Now add the remote host you’re going to connect to and the SSH port (22 by default), name the session as you see fit and choose Save just to make sure you keep it.
Next, still in puTTY, go into Connection, followed by SSH, and then Tunnels. Since we’re starting the VNC service locally on 5901 we want to use that as our source and destination ports as shown below.
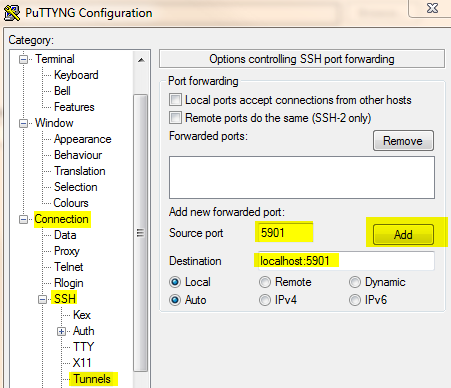
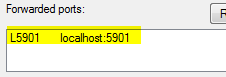
Once you fill it in, click on Add and it should put the information into the forwarded ports area as shown below.
Next, return to Session and click Save once more before the clicking Close to return to mRemoteNG. Once back in mRemoteNG click the OK button to return to the main panel. Under the Connections panel, you should now see a saved session under the heading PuTTY Saved Sessions.
![]()
Now, it is important to note that you will need TWO connection profiles to make this work. This is because you need to establish the secure connection via SSH first and then use that connection to tunnel over to the VNC session. Now you should add a new connection for the SSH tunnel itself.
In the configuration panel you will see a number of options that will need to be changed.
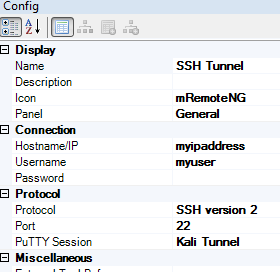
First, name the connection, make sure you can differentiate it from your VNC connection. Then change the connection Protocol from RDP to SSH version 2. Add your remote server Hostname/IP and if you so choose, your Username.
Now, the most important part, under the option for PuTTY Session, choose the drop down and select the tunnel session that you previously set up, this is what will actually open the tunnel port between your local system and the server.
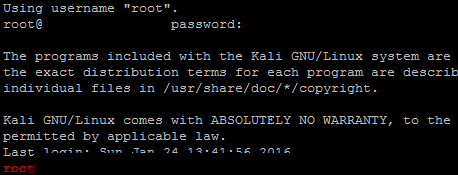
I would suggest you initiate your connection to the server now and make sure it works. If it does, you’ll log in and be dropped into a command prompt in mRemoteNG as follows.
You may also want to validate on your system that a new port is now open locally. To be clear, the action you just took established a tunnel on your local system to the remote system over SSH but using port 5901. So now the objective is to locally connect to 5901 with a VNC client. Using netstat should help you validate that.
Open a command prompt on your local system.
netstat -an |more |findstr 5901
In doing so, you should see something like the following.
![]()
If you do not, then something definitely went wrong (or you’re not using 5901) and you should consider checking the steps provided. Now that we have a tunnel established, we’ll need to create a VNC connection in mRemoteNG so that we can launch VNC over the tunnel.
Again go back and create a new connection.
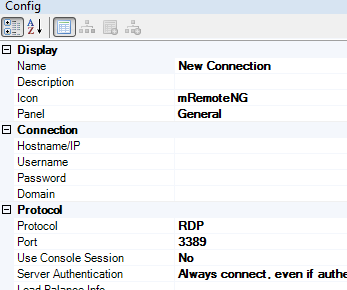
You will need to change RDP to VNC for the Protocol, update the Port from 5900 to 5901 and add the Hostname/IP to the configuration. Note that this is your LOCAL system so hostname should be localhost, 127.0.0.1, or whatever is appropriate. Remember that we opened a local port, 5901, to allow you to tunnel through SSH for VNC access. The config options should look similar to those below.
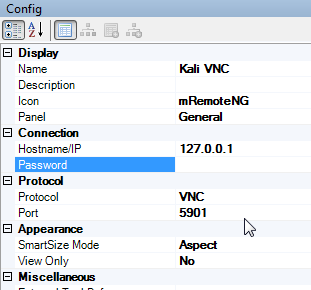
Now, you should be able to open your shiny new VNC connection and be prompted for the password you originally set. With any amount of luck, you’ll be provided with a VNC connection to your Kali instance running the Mate desktop.

Sources:
Information about Mate requirement:
https://forums.kali.org/showthread.php?26823-Remote-access-with-SSH-TightVNC-failed-with-new-Kali-2-0
Information about DBUS error:
http://ubuntuforums.org/showthread.php?t=1480094
Information about setting up a tunnel via SSH:
http://www.penguintutor.com/linux/tightvnc
http://www.systutorials.com/638/how-to-remote-control-linux-server-using-vnc-through-ssh-tunnel/
Information about how to setup SSH and TightVNCServer to start on boot:
http://elinux.org/RPi_VNC_Server


0 Comments